VERTICAL MILLING SLIDE: A PERSONAL OPINION
Many dealers sell a Vertical Milling Slide ("VMS") for use on the WM180 and other small lathes, including the 7x12 mini-lathes originating from Seig. I ordered a VMS with my lathe, thinking it would be useful for basic milling operations. But I was disappointed with it.
The VMS is meant to attach to the cross-slide in place of the topslide. The two bolts through the topslide base are taken out so the entire topslide can be removed, exposing the swivel disc within the cross-slide. The VMS is then bolted down to the disc.
The VMS is meant to attach to the cross-slide in place of the topslide. The two bolts through the topslide base are taken out so the entire topslide can be removed, exposing the swivel disc within the cross-slide. The VMS is then bolted down to the disc.
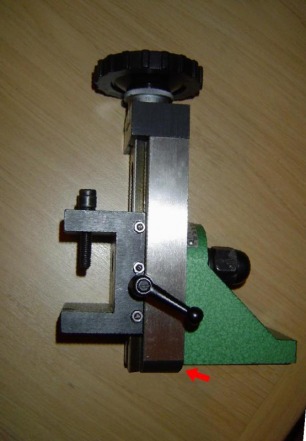
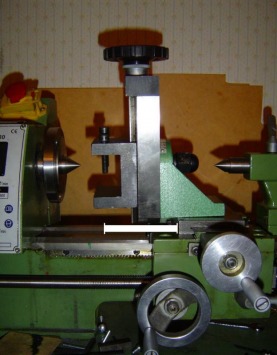
This general view of the VMS is a mirror image of the original photo, on which the "vice" was pointing to the right. I flipped the photo over so the orientation is the same as on the photos below. The red arrow is explained later. The vice is like a huge toolholder, with three Allen screws to clamp work in place. That might be handy for irregular shapes, but the screw tips will mark the work unless padding is used. The nearest screw in the photo is as far down as it will go, and there's nearly an inch between its tip and the "floor" below, so packing (or longer screws) will be needed for small items. The green component is just an angle plate, to which the silver-coloured slide base is fastened with the big black nut. The nut can be loosened so the angle of the slide base can be moved away from vertical.
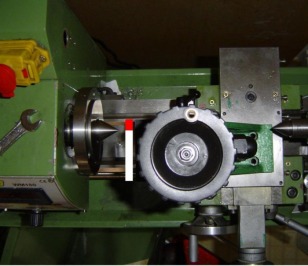
My first complaint is that the cross-slide can't be wound far enough over towards the back of the lathe to make proper use of the VMS. In this top view, the cross-slide is as far over as it will go before its feedscrew begins to disengage from the nut. The red and white bar indicates the width of the vice on the VMS. Only the red part is behind the lathe's centre-line. It follows that all but the smallest of workpieces will need to project rearwards from the vice, and will not have much support during milling cuts.
The same VMS is sold for Seig C3 "7x12 mini-lathes" and I see that Little Machine Shop in California sells an adaptor plate which lies on top of the cross-slide and is bolted to the swivel disc, with tapped holes so the VMS can be attached to the plate further towards the back of the lathe. But milling work can generate considerable force - for example, plunging in with a slot-drill. With the VMS and the work some distance behind the swivel disc, this force combined with leverage might cause the disc to slip and turn. I suppose a bolt through the back of the adaptor plate into a tapped hole in the cross-slide would cure this. If such a plate was used on the WM180, recesses would be needed in its underside to accommodate the cross-slide oil ports.
Another suggestion seen in Model Engineers' Workshop is a large plate with a matrix of tapped holes to accommodate clamps to retain the work, and a bar on the back to be held in the VMS. Again, cutting force plus leverage might make the swivel disc slip round. Also, the thickness of the plate will increase the overhang referred to in my next gripe .
I suppose that the most rigid solution might be to drill and tap holes further back on the cross-slide so the VMS could be bolted directly to it in a better position, but a recess would be needed for one of those oil ports. Further, the ability to mill at a limited (see below) angle by turning the swivel disc and VMS would be lost.
UPDATE: I have added an extension to the cross slide feedscrew, so it will travel further back across the lathe's centre line.
My second concern is that the VMS projects a long way forward of the cross-slide. The white bar in this photo indicates the extent of the overhang, which will again reduce rigidity.
Thirdly, the tall silver coloured slide base of the VMS projects down below the level of the cross-slide top, as shown by the red arrow in the general view earlier on this page. It comes down as far as the white bar in this photo. This means that the swivel disc can only turn a few degrees either way before the slide base fouls the cross-slide, which limits the ability to mill at an angle.
Fourthly, and this is perhaps only a minor quibble, the feedscrew which sends the slide up or down has a right hand thread, so turning the handwheel clockwise brings the slide up towards your hand. To me, this is counter-intuitive; the other slides on my lathe move away from my hand when their handwheels are rotated clockwise.
As you will have gathered, I don't think much of the Vertical Milling Slide. The £80 price would have gone a quarter of the way towards the old Dore Westbury milling machine I bought for £320 on Ebay, after I realised the VMS didn't meet my requirements.
OK, I'll stop moaning and give you someone else's more optimistic view. Andy Smith, another Warco WM180 owner, had more patience than me and persevered with his VMS . He took the Little Machine Shop approach, making an adapter plate modelled on the plan here: http://littlemachineshop.com/Instructions/MillingAttachmentMountSIEG.pdf , but with dimensions appropriate to the WM180. Andy rotated the three holes shown in a vertical line (the outer two take the bolts which hold the plate to the swivel disc and the middle one accepts the spigot on the disc) through 90° for a more secure fixing. He then lopped off the "vice” on the slide of the VMS, leaving a flat surface to which he could clamp a small milling vice. The clamps go into slots on the sides of the new vice, so it can be repositioned vertically.
Andy finds these modifications have made the VMS perfectly satisfactory for light milling jobs, provided the work is fed against the rotation of the cutter (no "climb" milling), and provided that the sequence of work is planned to avoid too many swaps between turning mode and milling mode.
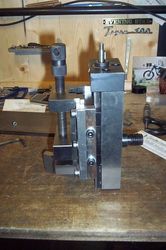
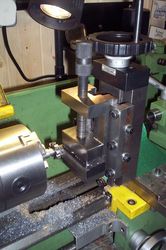
The pictures below show Andy's partly assembled VMS with the new vice attached, and the complete VMS in use. Clicking on either photo will enlarge it.
